How Direct Sidekick Shops Work
Direct Sidekick Shops allow you to sell your on-hand inventory, collect customer pre-orders, give customers and prospects a place to request samples, and run your own promotions and sales.
In addition to their main on-hand inventory shop, many of our customers use shops to run special Christmas in July sales, Black Friday sales, bridal/baby registries, and sample giveaways.
Once you share your shop link, your customers can add items to their cart and check out on their own.
When your customers check out, you will receive an email showing who shopped, what they purchased, if they are interested in booking a party, and what their payment method was.
After that, you can coordinate local pickup or ship their order to them.
You can have any number of shops, and they all sell from your on-hand inventory (unless choosing a direct shipping sale), preventing your customers from purchasing more of an item than you have in stock.
Here is how a customer order flows through Direct Sidekick
- A customer places an order from your shop.
- If the customer is in your contacts list, an invoice is entered for the customer. If not, the customer is added to your contact list, and an invoice is entered for him or her.
- You and your customer receive an order confirmation email.
- Your inventory counts and your accounting reports are updated.
- If you attach an email drip campaign to your shop, your tasks and emails are scheduled and sent automatically.
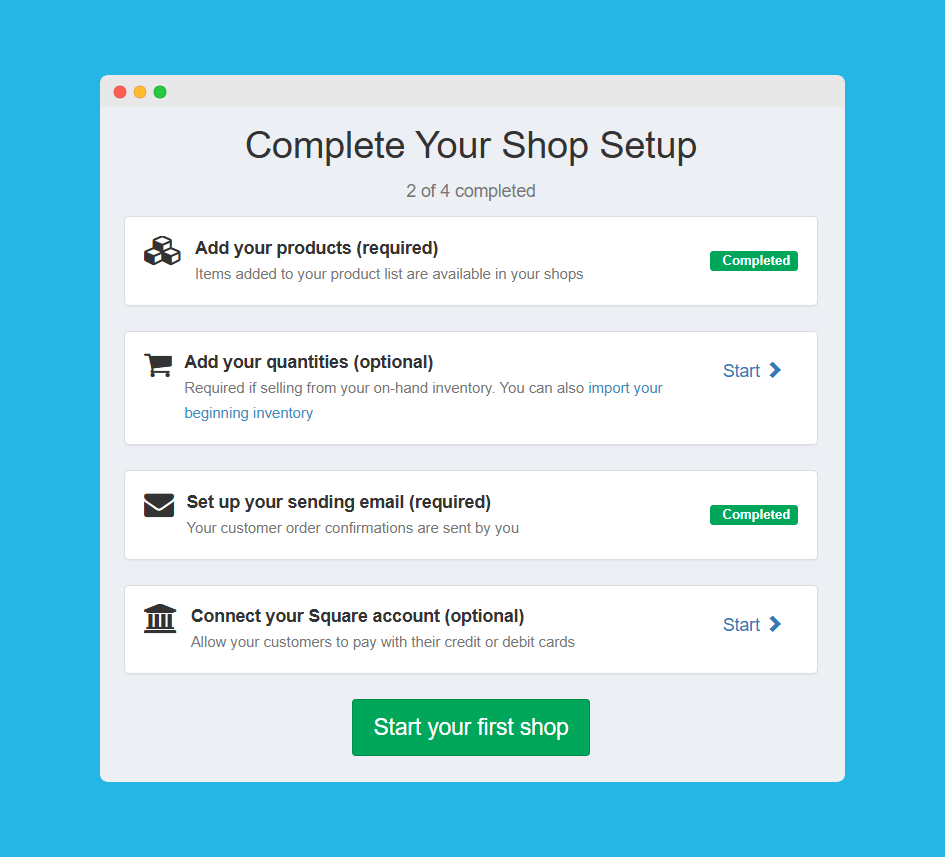
Direct Sidekick walks you through the following steps using our shop setup wizard, and below we’ll explain each step in more detail.

How to set up your first shop
Add your products to Direct Sidekick
There are a few ways to enter your product list into Direct Sidekick.
- If a team member or Direct Sidekick has a product list for your company, you can copy it by clicking on the Share URL they share with you. Or, if you have a team, you can share your list with them with the click of a button!
- You can use the Product List file importer if you have a product list in a CSV file.
- Lastly, you can click the + New Product button from your product list and enter your items individually.
Bonus: With any of the above methods, you can send your product list to Square by clicking on the “Sync with Square” or “Add as new item in Square” checkbox when adding your items, and the items will be sent to Square to use with the Square POS.
Add your item quantities
With Direct Sidekick, you can sell items from your on-hand inventory, or you can sell anything from your product list/catalog and order and ship the items to your customers.
If you sell items from your on-hand inventory, you will need to enter your quantities for them in Direct Sidekick.
To start, if you have a file with your current on-hand inventory, you can import your full list as a CSV file with our beginning inventory importer.
Then, ongoing, you will enter Purchases in Direct Sidekick anytime you purchase items for your on-hand inventory.
If you do not have a current inventory list, you can do an inventory account and either import the new list or enter a purchase in Direct Sidekick to add the counts.
Set up your sending email
Customers who purchase from your shop will receive an automated confirmation email from you. Before setting up your first shop, you will need to first set up your email.
All automated drip email campaigns attached to a shop are also sent from this email address.

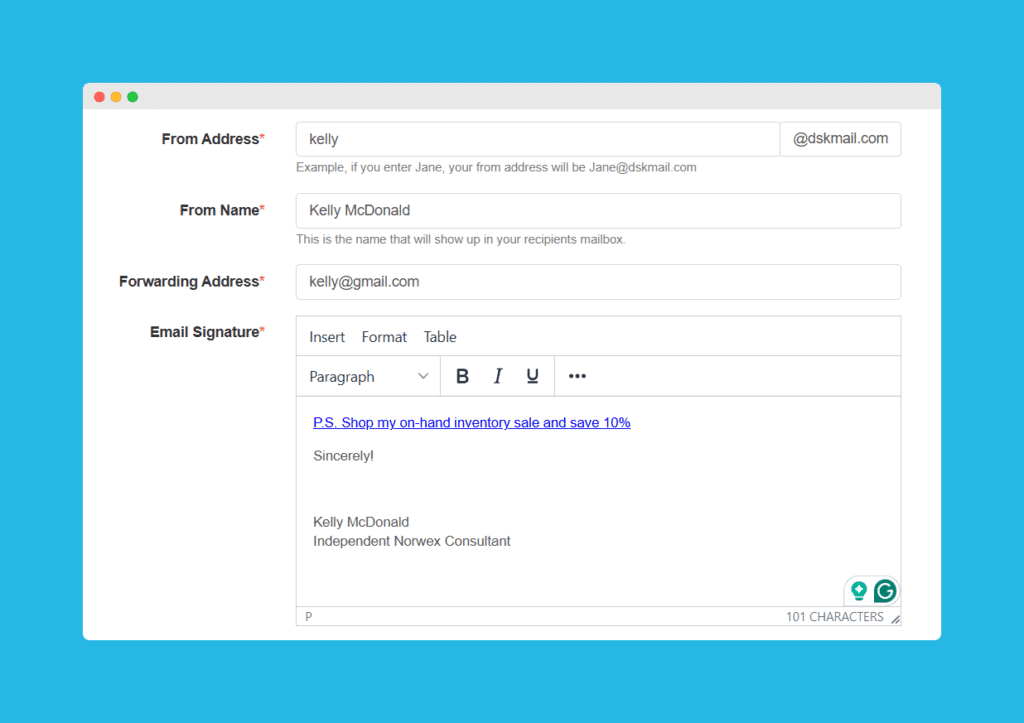
The “From Address” field is the address your emails are sent from. In the image above, our example customer Kelly McDonald chose “kelly@dskmail.com” as her sending address. We use our own @dskmail.com email sending service and focus on email deliverability.
The “From Name” field is what shows up in their email program as who the email was sent to from.
Next, the “Forwarding address” is where the email replies are sent when your customer clicks reply in their email and sends you a response.
Lastly, your “Email Signature” is an extremely valuable and often overlooked sales tool. Add a link to your main shop and/or your sample request shop.
This signature is added to the end of your order confirmations and your automated drip emails. So, every email they receive from you is an opportunity to shop your shop and remember you and what you offer!
Connect your Square account (optional)
If you’d like to collect payment via your connected Square account to allow your customers to pay you with their credit or debit card, you will want to connect your Square account to Direct Sidekick.
Simply click the Connect Square button, log into your Square account, and follow the prompts.

Enter your shop settings
Click on Shops in the menu.
Click the + New Shop button.
Next, fill out the Shop setting form:
- Enter the date you’d like your shop to be “live” in the Published field. This is the date your shop is viewable by you and your customers.
- If you’d like an ending date for your sale, enter it here. Adding an ending date automatically adds a countdown timer to your shop homepage, creating urgency.
- Enter your Shop name.
- Your shop slug is part of the link you’ll share with your customers. For example, if I choose the-best-shop as the slug, I will share this link: app.directsidkeick.com/shop/the-best-shop.
- Enter your shop description. This is the section above your items for sale. You can format this any way you’d like. Things to consider adding to the description:
- Your name and contact information so your shoppers know how to get in touch with you if they have any questions.
- Links to your socials.
- Upcoming event list.
- Upload your header image. This shows up at the top of your page. For the clearest image, use a high-quality image with a size of 1200 px wide by 384 px tall.
- Optional: enter a password for your shop. Many companies have compliance rules that do not allow sales to be made on the web unless they are in private groups. Adding a password to your shop will keep you in compliance. You will then share this password when you share your shop.
- If your Square account is connected, you can accept payments with Square OR invoice your customers after they place their order, where you schedule payment. You can choose which payment options you’d like to offer your customers.
- You can set a tax rate or keep it as a tax-exempt purchase. If you haven’t set your tax rates yet, you can do that in the Finance Settings.
- If you’d like to offer free local pickup, check the checkbox. After your customer purchases from your shop, you will coordinate with them to pick up their order.
- If you’d like to add a flat rate shipping option, check the checkbox and enter the dollar value you’d like to charge them for shipping.
- The direct shipping setting is for when you’d like your customers to be able to order any product from your shop WITHOUT IT COMING OUT OF YOUR ON-HAND INVENTORY. This is used for pre-orders or sales where you don’t have the products in inventory, and you will place the order from your company’s back office.
- If you’d like to offer a discount on your products, enter it in the Discounts field.
- Check the Defer Processing Fees if you’d like to charge your customers for your payment processing fees (Square fees). If this is checked, your customer will see a 2.9% + $0.30 fee on their order.
- If you’d like to ask your customers if they’d like to book a party with you, check the Enable Bookings checkbox.
- Then, enter your booking sales pitch in the Booking Text field. For example, “Would you like to book an in-home or online party and earn free products? Plus, I’ll bring a free gift to the party just for booking!”
- You can select an email drip campaign to have an automated series of emails sent to your shopper after checkout.
- Now, select the products that you’d like to add to your shop. All of the fields are searchable, and most are sortable. For example, you can sort by the In Stock field to show the items you have most at the top of the table.
- Click the save button, and you’re done!
Back on the Shops page, you will see a list of your shops. You can click on the shop Name to edit it or click on the view link on the right to view it.
Now, from your shop, you can share your shop or the individual items on Facebook, Pinterest, X (formerly Twitter), or anywhere else you can post your link.
