Welcome to Direct Sidekick! We’re here to help make your accounting and inventory SIMPLE.
Our ongoing 3-step accounting and inventory management process
Step 1: verify imported transactions monthly and make necessary category changes.
Step 2: add purchases when you place orders for inventory for resale.
Step 3: remove items from inventory when sold (invoices) or for demo/advertising/giveaway/personal use (adjustments).
IMPORTANT: many of the following tasks are only required to “catch up” your books. You only need to do this once! After your books are caught up, you will need to follow the 3-step process above.
Import and categorize your income and expense transactions
There are three ways to enter your income and expense categories in Direct Sidekick:
- Connect your accounts to automate (preferred).
- Once you link your accounts, Direct Sidekick will automatically import and categorize POSTED transactions daily.
- IMPORTANT: The start date you choose is the date Direct Sidekick will attempt to import from your financial institution. The amount received is determined by the financial institutions. Some provide Direct Sidekick with two years of data, while others provide only three months. If yours only provides three months, you will also need to use option 2 just to get caught up.
- Export transactions from your Bank as a CSV file, import them into Direct Sidekick and categorize your transactions.
- Or enter one-by-one by clicking the + New Transaction button.
Once your income and expense transactions are added to Direct Sidekick, you can edit your categories as needed in one of the following ways:
- Check the checkbox to the left of the transactions, click the edit button at the top of the table, change the category, and click submit.
- Click the blue checkbox on the right of the transactions, edit the transaction, and click submit.
The right edit button allows you to change more than just the category. If you only need to change the category, you can use the checkbox to save time.
Common Income & Expense Questions:
Can I add my custom categories?
Yes, you can add your custom transaction categories here.
How to bulk change categories?
You can check multiple checkboxes on the left of your transactions and change them all to the same category at the same time.
What do I do with my personal expenses?
If you have expenses that are not related to your business, you can mark them as Personal expenses, which removes them from your business accounting.
What category should I use for payments to my company for on-hand inventory purchases?
When you purchase inventory for resale with your company, you can use the Inventory Order Payments category.
Enter your inventory
If you plan on tracking your inventory costs for COGS in Direct Sidekick, you will need to first enter your inventory into your on-hand inventory. The directions below will show you how to do that and account for sales and giveaways before your current inventory for the year.
IMPORTANT: You will need the following things before starting:
- Your current on-hand inventory list, including quantities and your average cost paid.
- The costs of your sales for the year BEFORE the date of your current on-hand inventory count.
- The costs for your giveaways for the year BEFORE the date of your current on-hand inventory count.
- Items removed for personal use for the year BEFORE the date of your current on-hand inventory count.
Enter your beginning inventory
To import your beginning inventory, you’ll need a CSV file that includes your item numbers (SKUs), the product name, the quantity on hand, and your average cost.
A common question we receive is, what do you do if you don’t know the average cost of your existing items?
Per our CPA, you can use the best method you can justify for estimating the cost of the item. This could be either 1) rebuilding your costs with your past purchases or, more likely, 2) using the retail price minus your standard discount. This is only for inventory you do not know your costs for. By entering your purchases using our 3-step process moving forward, Direct Sidekick will automatically calculate your item cost for you.
Once you have that, go to the beginning inventory importer under Settings -> Finance -> Beginning Inventory Import.
When importing your CSV file, enter the date you performed the inventory count for the “Beginning Inventory Start Date.”
You’ll see this page below:
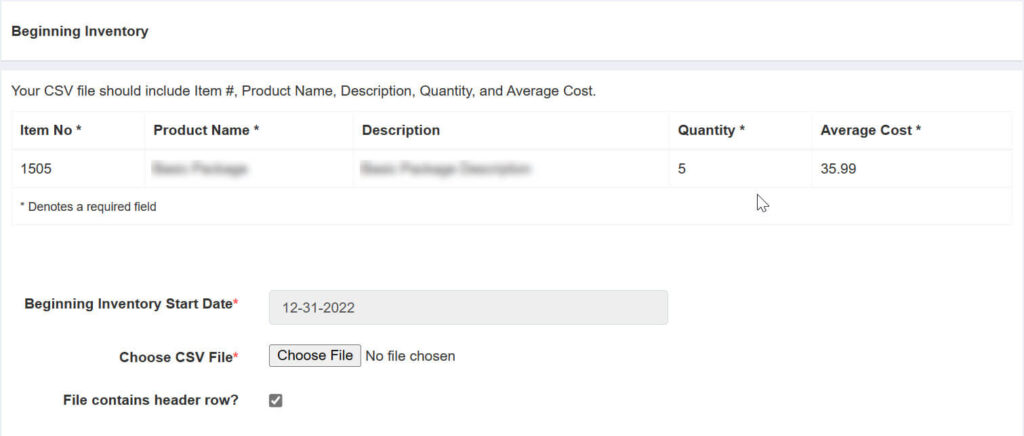
Next, click the Choose File button and navigate to your CSV file on your computer. Click on the file to start the import.
Now, map the field names (the names in the top row (header) of the CSV file) in your file to our field names. For example, in the image below, the CSV file had the name item_num. All you need to do is click on the dropdown and select item_no. Do this for all of the required fields.
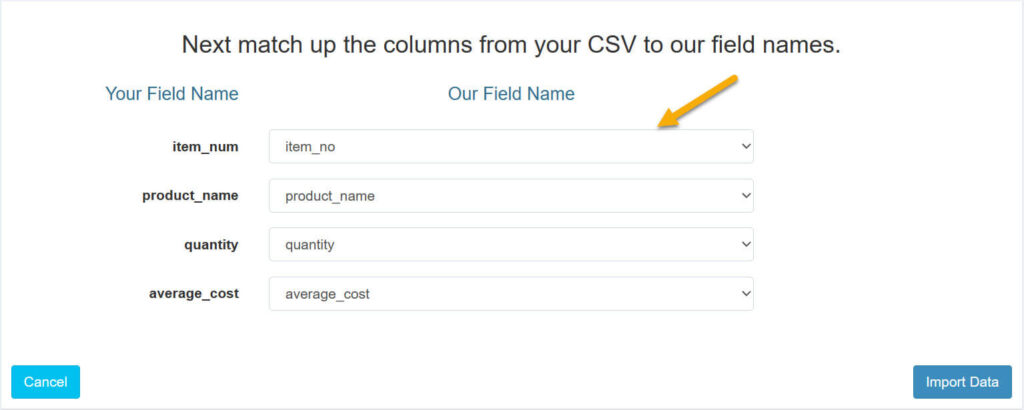
After that, click the Import Data button at the bottom right of the page, and your items will be imported.
Entering current year catch-up inventory order if NO PRIOR YEAR ENDING – 4 Steps
Follow these instructions if your taxes show $0 for your prior year’s ending inventory on your tax return. The following steps will enter the costs of your sold items, demo items, and personal use items into Direct Sidekick from the beginning of the year to the date of your beginning inventory import so your COGS report is accurate.
Step 1 – Add new items
First, you will need to add a new product named something like “Beginning Inventory Sales Adjustment” in your product list to use for the cost of items you sold between the beginning of the year and the date of your beginning inventory import.
Leave the Cost and Retails fields blank.

Next, if you gave away items from your on-hand inventory for marketing reasons, add a new product named something like “Beginning Inventory Giveaways Adjustment” in your product list to use for the cost of items you gave away between the beginning of the year and the date of your beginning inventory import.
Leave the Cost and Retails fields blank.

Lastly, if you removed items from your on-hand inventory for personal use, add a new product named something like “Beginning Inventory Personal Use Adjustment” in your product list to use for the cost of items you removed between the beginning of the year and the date of your beginning inventory import.
Leave the Cost and Retails fields blank.

Step 2 – Add a Purchase
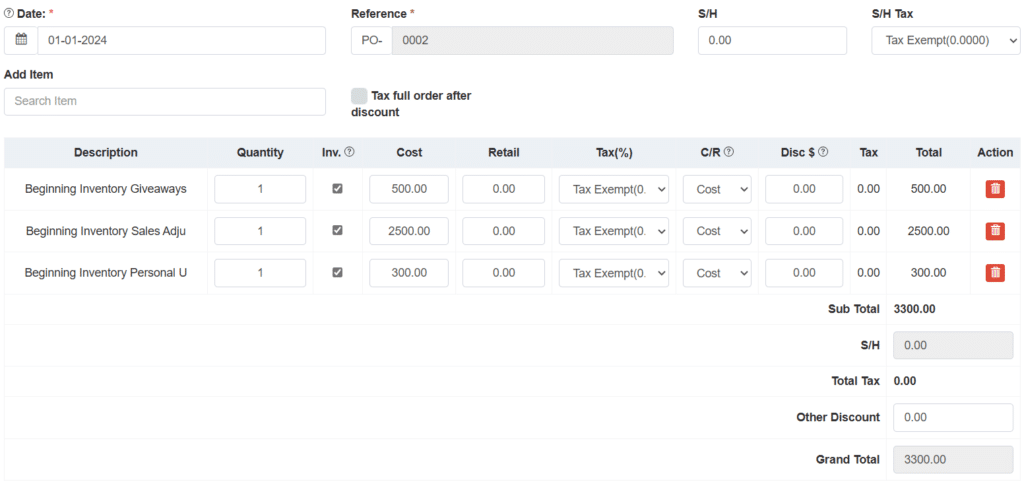
Now, enter a new purchase by clicking on the + New Purchase Order button from your Purchases list.
You will enter the items above by searching for them in the Add Items search box.
Once added to the order, enter your TOTAL cost (amount you paid, not retail, unless it is the same) of the items you sold, gave away, and removed for personal use in the cost fields.
IMPORTANT: Use January 1, of the tax year of your beginning inventory, for the date of the purchase.
Step 3 – Enter an Invoice for Sold items
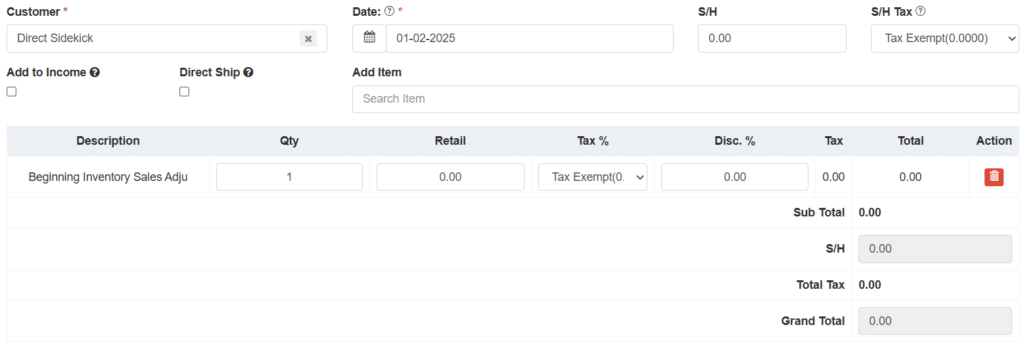
Now enter an invoice for the sold items by clicking on the + New Invoice button from your Invoices list.
Enter 1 for the quantity and 0.00 for Retail. The purpose of this invoice is to remove the new item and add the value to COGS.
IMPORTANT: Use January 2, of the tax year of your beginning inventory, for the date of the purchase.
Step 4 – Enter an adjustment for giveaways
Now, enter an adjustment for your giveaways by clicking on the + New Adjustment button from your Adjustments list.
Choose the Demo/Advertising/Giveaways purpose. Use your name for the Customer. Search for your Beginning Inventory Giveaways Adjustment item from the add item search and add it to your order. Leave 1 as the quantity.
IMPORTANT: Use January 2, of the tax year of your beginning inventory, for the date of the purchase.
Once you save this, the giveaway amount will be added to the adjustments section of the COGS report and an advertising expense will be added to your transactions list.

If you removed items for personal use, repeat Step 4 above using Personal Use for the adjustment Purpose. This will remove the personal use items and add their costs to the adjustments section of your COGS Report.
That’s it! Your inventory from the date of your beginning inventory import and the start of the current tax year is now matched up. Now, you will continue to use our 3-step process and add your inventory orders when they happen.
Entering current year catch-up inventory orders if MATCHING PRIOR YEAR ENDING INVENTORY FROM TAX RETURN – 6 Steps
Follow these instructions if your prior year’s tax return shows a non-zero value for ending inventory. This differs from the above instructions by requiring two small but important tasks to adjust your inventory to match your prior year’s ending inventory.
Step 1 – Add new items
First, you will need to add a new product named something like “Beginning Inventory Sales Adjustment” in your product list to use for the cost of items you sold between the beginning of the year and the date of your beginning inventory import.
Leave the Cost and Retails fields blank.

If you gave away items from your on-hand inventory for marketing reasons, add a new product named something like “Beginning Inventory Giveaways Adjustment” in your product list to use for the cost of items you gave away between the beginning of the year and the date of your beginning inventory import.
Leave the Cost and Retails fields blank.

If you removed items from your on-hand inventory for personal use, add a new product named something like “Beginning Inventory Personal Use Adjustment” in your product list to use for the cost of items you removed between the beginning of the year and the date of your beginning inventory import.
Leave the Cost and Retails fields blank.

Since we are matching your prior year’s ending inventory, we’ll need to add one more product. You can name this product something like “Beginning inventory adjustment” or similar.
Leave the Cost and Retail fields blank.

Step 2 – Add a Purchase for your prior year’s ending inventory
IMPORTANT: Use December 31 of the tax year PRIOR TO your beginning inventory for the date of the purchase. For example, if you are working on 2024 taxes and your beginning inventory date is May 1, 2024. You will need to enter December 31, 2023 as the purchase date.
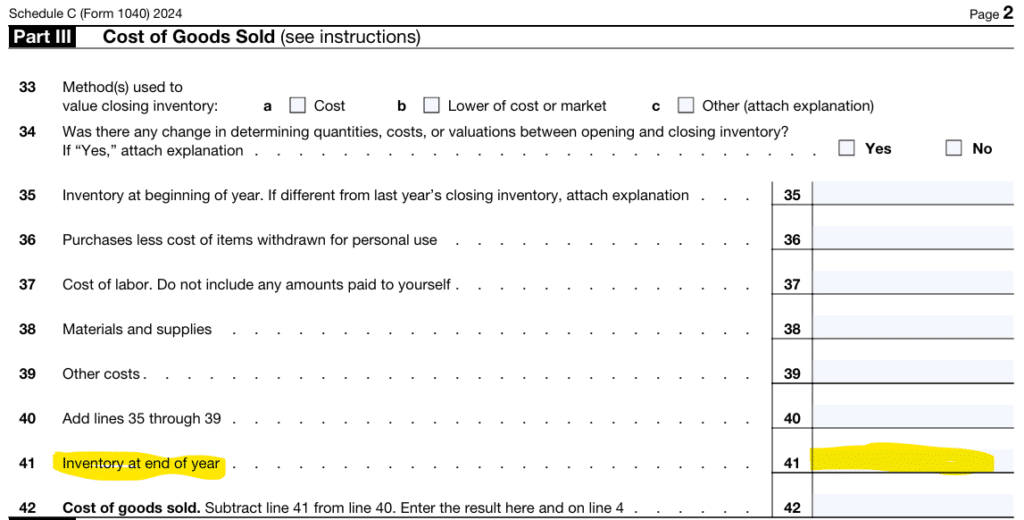
You will need the amount listed on your prior year’s tax return for “Inventory at end of year” (highlighted below).
Enter a new purchase by clicking on the + New Purchase Order button from your Purchases list.
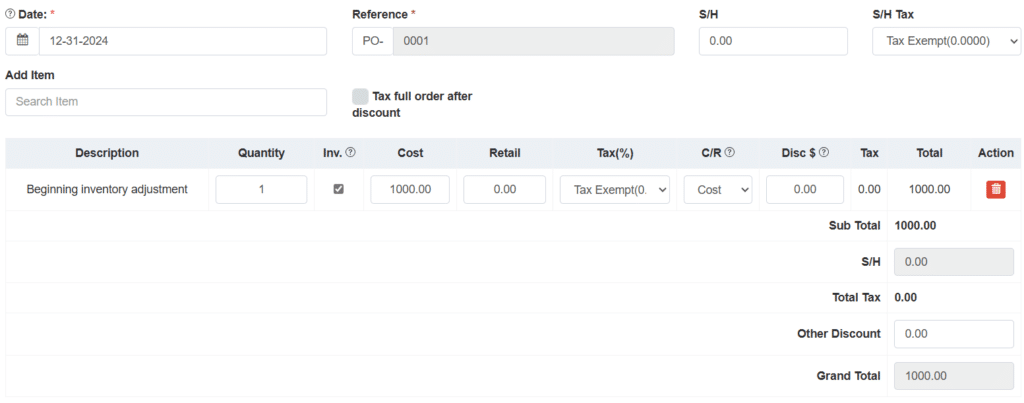
Add your Beginning inventory adjustment item to your purchase by searching for it in the add item search box.
Enter the quantity as 1, and the amount from your tax return for your cost. Nothing else needs to be changed.
Step 3 – Enter a separate second purchase
Enter a separate second purchase by clicking on the + New Purchase Order button from your Purchases list.
Add the other three items above by searching for them in the Add Items search box.
Once added to the order, enter your TOTAL cost separately for each item (the amount you paid, not retail, unless it is the same) you sold, gave away, and removed for personal use in the cost fields.

Step 4 – Enter an Invoice for Sold items
Now, enter an invoice for the sold items by clicking on the + New Invoice button from your Invoices list.
Enter 1 for the quantity and 0.00 for Retail. This invoice removes the new item and adds its value to COGS.
IMPORTANT: Use January 2, of the tax year of your beginning inventory, for the date of the purchase.

Step 5 – Enter an adjustment for giveaways
Now enter an adjustment for your giveaways by clicking on the + New Adjustment button from your Adjustments list.
Choose the Demo/Advertising/Giveaways purpose. Use your name for the Customer. Search for your Beginning Inventory Giveaways Adjustment item from the add item search and add it to your order. Leave 1 as the quantity.
IMPORTANT: Use January 2, of the tax year of your beginning inventory, for the date of the purchase.
Once you save this, the giveaway amount will be added to the adjustments section of the COGS report and an advertising expense will be added to your transactions list.

If you removed items for personal use, repeat Step 5 above using Personal Use for the adjustment Purpose. This will remove the personal use items and add their costs to the adjustments section of your COGS Report.
Step 6 – enter one last adjustment to match up with your prior year’s ending inventory.
Now, enter your last adjustment to remove your ending inventory product by clicking on the + New Adjustment button from your Adjustments list.
Choose the Personal Use adjustment purpose. Use your name for the Customer. Search for your Beginning Inventory Giveaways Adjustment item from the add item search and add it to your order. Leave 1 as the quantity.
IMPORTANT: Use January 2, of the tax year of your beginning inventory, for the date of the purchase.

Once you save this, the giveaway amount will be added to the adjustments section of the COGS report, and the Ending Inventory Value should match the original beginning inventory you imported.
That’s it! Your inventory is now up to date, and your ending inventory matches the current tax year’s beginning inventory.
Now you will continue to use our 3-step process and add your inventory orders when they happen.
